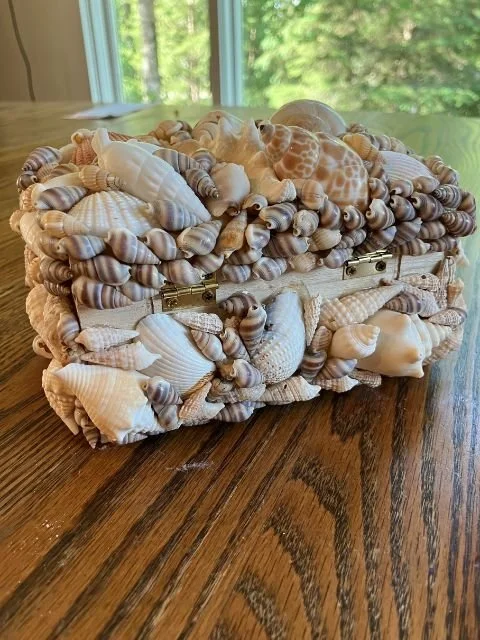
Seashell Trinket Boxes
I don’t even remember why we decided to make these boxes. We may have saw one at a thrift store (they’re usually broken), and realized we could make our own. So we took our heinie’s (had no idea it was spelled that way), and went to Michaels. We found cheap wood boxes. We each got a big and a small trinket box. So six total (this is important for later). Grabbed the glue and headed home. I ordered some mini seashells from Amazon and I had a mixed bag of shells from the thrift store.
We were ready to shell-ibrate! Sorry, had to. 😁 Little did I know I was about to spend two weeks making SIX shell boxes. E6000 has a warning label that says, ‘MAY CAUSE CANCER"‘. Great. My husband says, “That’s how you know it’s the good stuff.” Well, now I didn’t want my kids using it so they laid out the shells and I did the gluing. It took a very.long.time. E6000 does have a permanent marker smell so if you’re not willing to take the risk, I’m sure there is another glue out there. Not sure how well hot glue holds up. E6000 was recommended by most shell collectors.
A little obsessed with how they turned out! Definitely something I will keep forever. 😍

WHERE TO BUY SEASHELLS
I didn’t realize how expensive seashells are! I went to Michaels to look for some and holy toledo! A small bag was ten bucks! I went to the thrift store instead and found large bags of seashells for less than that. I highly advise you to check thrift stores for seashells first. You’ll need a variety of shapes and sizes to make it look interesting. I bought mini seashells from Amazon. We used them for making borders and filling in small gaps.
SUPPLIES NEEDED FOR MAKING SEASHELL TRINKET BOX:
-E6000 clear industrial adhesive
-seashells in various shapes/sizes
-lots of time and patience
HOW TO MAKE YOUR OWN SEASHELL TRINKET BOX:
Heed this warning: You can only do one side at a time. One layer at a time. Or else it will fall apart. Also, beware of the hinge. It needs space or else it will not open.
Proceed with caution.
1. Choose a side you want to start. We usually did the top first.

2. Lay out your bigger shells where you want them to go. Add glue to the shells and place them in their rightful spots.
3. Then layer on the medium shells and fill in the gaps with the smaller shells. Shells may slide down the edges if you layer too many near the side and they haven’t dried down enough.
4. Let it dry. Here’s your permission to take a break. Go do something else and come back later for the sides.
5. The sides are a bit trickier. You may need to prop your box against something to keep it upright.
6. Again start with the big shells. You’ll want to let it dry down a little bit before you add medium shells and smaller shells. Otherwise, the shells start to fall off since the box doesn’t sit flat anymore.
7. Go get a snack or maybe even go to bed.
8. Come back later and repeat the steps for the remaining sides. Remember to leave space near the hinge so the box can open.
9. Set it next to your bedside or on a shelf and add your fun trinkets inside!